REVIEW · KYOTO
Roketsu dyeing experience: M course Roketsu Dyeing Experience
Book on Viator →Operated by 京ローケツ やまもと染工 · Bookable on Viator
Bucket-dye Kyoto, right at your fingertips. This Roketsu dyeing workshop in the Ukyo Ward gives you a hands-on break from temples and crowds, where you actually draw, paint wax, and dye your fabric. I really like the focus on 100% bucket dyeing (not just a quick demo), and I also like that you leave with a draw-and-dye souvenir you made yourself. The one thing to plan for is that English support can be limited, so you’ll rely heavily on visuals and hands-on guidance.
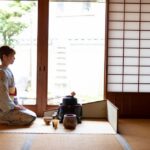
This is also the kind of activity that feels calm, not rushed. The studio is set up for people with all skill levels, and the pace is gentle even when your design is more detailed than expected. One possible consideration: the session length can stretch if you choose a complex pattern, so build in some flexibility on your schedule.
In This Review
- Key things to love about Roketsu73’s Roketsu dyeing course
- Kyoto Roketsu dyeing: what the workshop really is
- Where you go and how you plan your time
- Choosing your item and design: stencils, freehand, and your sketch
- Wax resist painting: where your control comes from
- Dyeing in the bucket: why this class feels more authentic
- Finishing and taking it home the same day
- What you can make: shirts, tote bags, and banners
- Language and instruction: what to expect when English is limited
- Price and value in Kyoto: why $25.77 can be a smart buy
- Getting to Roketsu73: not central, but worth the trip
- Who this workshop is best for (and who may want another option)
- FAQ
- How long is the Roketsu dyeing experience?
- Can I take my dyed item home the same day?
- Do I need drawing or art skills to do this workshop?
- Can I use my own sketch?
- What items can I dye?
- Is English widely spoken during the class?
- What if the weather is bad?
- What is the cancellation policy?
- Should you book this Roketsu dyeing workshop?
Key things to love about Roketsu73’s Roketsu dyeing course
- 100% bucket dyeing you can feel and control as you work
- Draw-and-dye souvenir you take home the same day
- Wax-resist painting with practice help before you start your real design
- Stencils or freehand so you can choose your comfort level
- Calm, hands-on studio time that breaks up walking-heavy Kyoto days
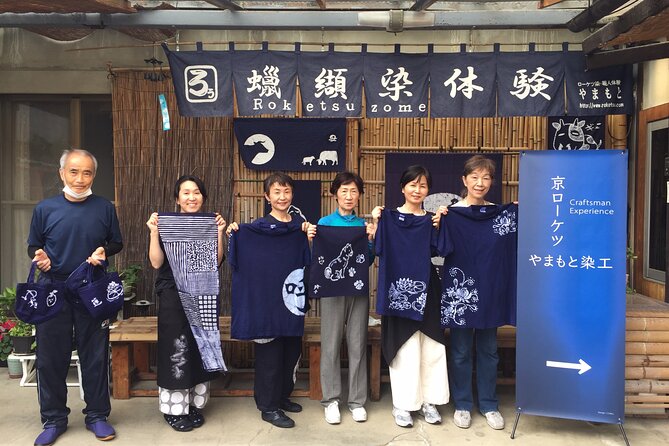
- Small groups (up to 30) with patient guidance at each step
Kyoto Roketsu dyeing: what the workshop really is
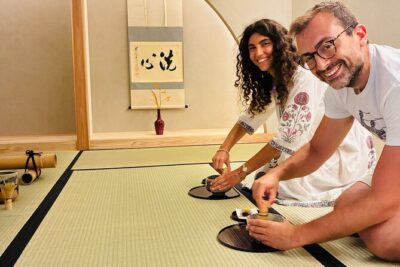
Kyoto has plenty of crafts you can watch. This one is different because you do the work. The “Roketsu dye craftsman experience” is built around a classic wax-resist method paired with dyeing in a bucket, so your hands are involved from the first sketch to the final reveal.
The “why” is simple: when you paint the wax and then dip into dye, you can see cause and effect. Your choices show up on the fabric. And since you make something wearable or hangable, the finished result becomes an actual memory you live with.
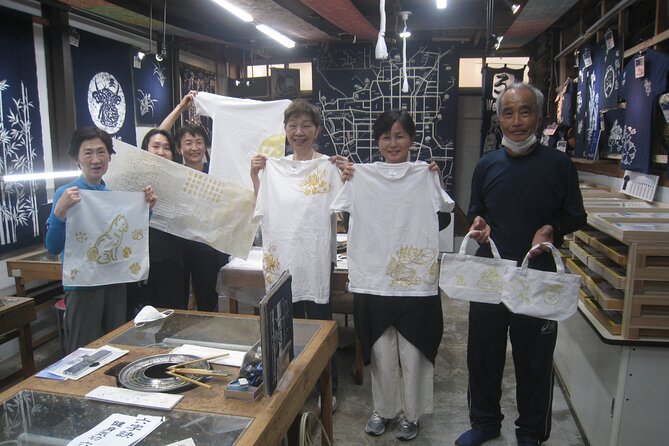
The workshop is run by 京ローケツ やまもと染工, a small operation with a family feel. Reviews repeatedly mention the owner and his mother, Yoko, as patient guides who give clear direction even when language is limited. That matters, because Roketsu doesn’t teach itself—at least not at speed.
You can also read our reviews of more tours and experiences in Kyoto.
Where you go and how you plan your time
You’ll meet at Roketsu73 Nishikyōgoku Umazukachō, Ukyo Ward, Kyoto (615-0885). The activity ends back at the same meeting point, which keeps logistics easy after a busy day.
Timing-wise, the experience is described as about 2 hours (and roughly 90–120 minutes in practice), and many people finish close to that. Still, if you pick a more intricate design or want extra time for drawing, plan for a longer session. One reviewer noted taking closer to 3 hours because they focused on detailed designs, without feeling rushed.
That flexibility is a good thing. It means the workshop isn’t just about hitting a checklist. It’s about letting you build something you’ll actually want to keep.
Choosing your item and design: stencils, freehand, and your sketch
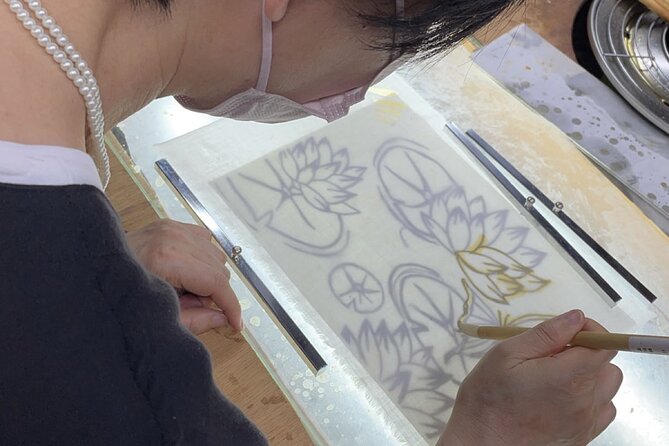
The heart of the workshop is that you create your own pattern. You can start from the studio’s design library, and you can also freehand if you prefer. Reviews mention “hundreds” of stencil options, so you’re rarely stuck staring at a blank page.
If you have your own sketch, you can bring it. The workshop explicitly states you can produce original works based on your sketch, which is a big deal if you want something personal rather than a copied pattern.
Here’s the practical value of that choice:
- If you’re not artistic, stencils help you start fast and keep momentum.
- If you are artistic, freehand lets you make it feel like your own art project.
Either way, you’ll get guidance through the steps. The studio setup is built for people who may feel nervous at the beginning—so you should expect patient instruction, not judgment.
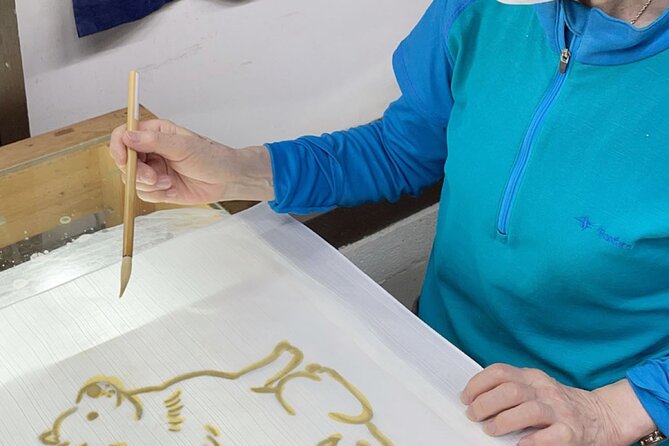
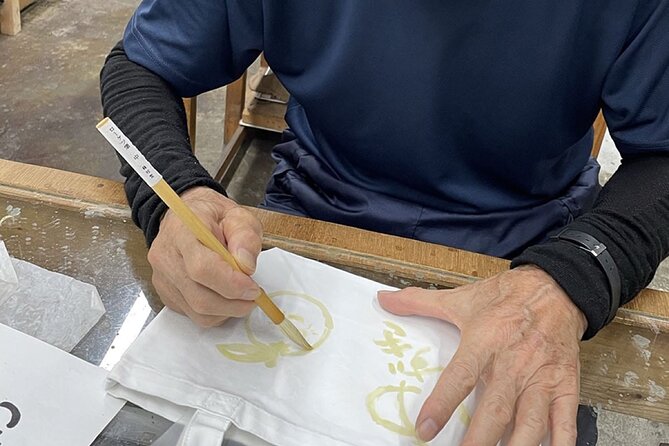
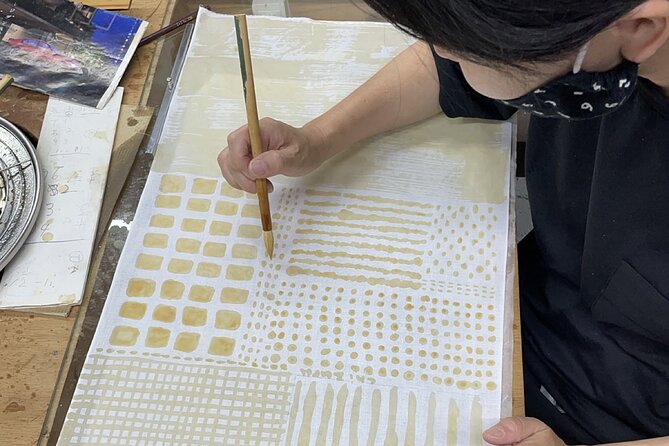
Wax resist painting: where your control comes from
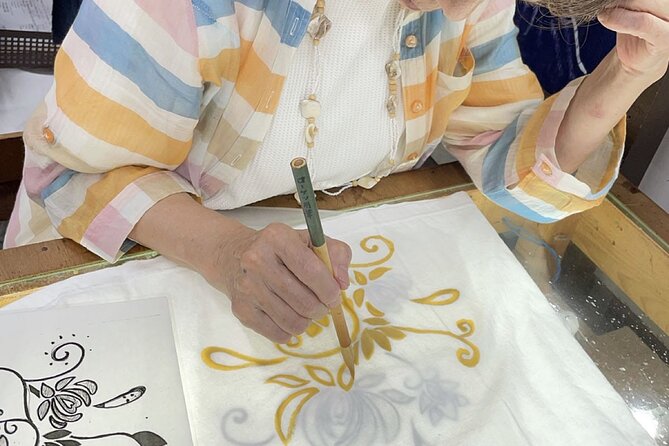
Roketsu dyeing is a wax-resist process. In plain terms, you paint melted wax onto your fabric in the pattern areas you want to protect from the dye. Where wax goes, dye has a harder time reaching the cloth, so the final look depends on how carefully and confidently you apply those lines.
What I like about this step for beginners is that it’s not just “good luck, hope it works.” You get a practice run on a small piece of cloth before you jump into the real item. That practice reduces the fear factor a lot. You’ll learn how the wax behaves and how thick your lines need to be.
From the reviews, the guidance tends to be gentle and incremental. People highlight that instructors don’t rush you, and they help you reach a better result without taking over your design. That balance is important: you want your souvenir to feel like it came from you, not from someone else.
Also, this part is oddly soothing. Several reviews call it relaxing or therapeutic, and you can see why—painting wax is repetitive in a good way. Your brain shifts from sightseeing mode to making mode.
Dyeing in the bucket: why this class feels more authentic
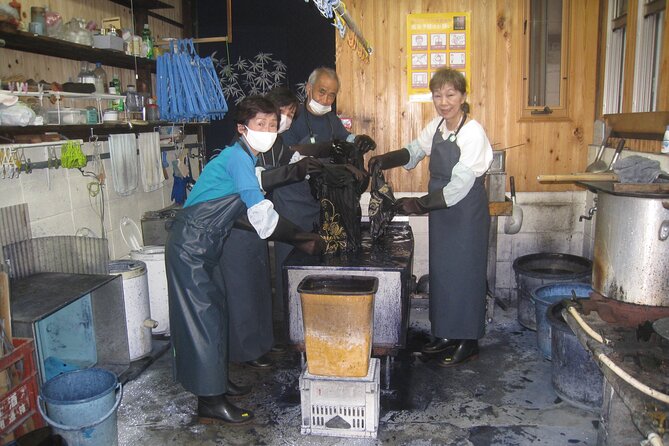
The workshop name matters here: it’s 100% bucket dyeing. That means you’re not just doing wax painting and waiting for someone else to run the dye process like a black box.
Bucket dyeing gives a more hands-on, traditional feel. The dye step is where your protected and unprotected areas finally become the pattern you designed. Even if the exact mechanics aren’t described in detail in your materials, you’ll understand the principle fast once you see the setup.
And yes, this is still an accessible workshop. The studio aims for a “full-fledged dyeing experience” that’s doable without special equipment knowledge. Your job is to follow the process step-by-step with help close by.
The biggest payoff for most people is visual. You finish with a souvenir that has real craftsmanship energy, not a mass-produced print. One review sums up the value as a unique, affordable cultural craft you can wear or hang afterward.

Finishing and taking it home the same day
A major advantage of this workshop is that you take your item home on the day. The experience is planned so the whole journey takes about 90–120 minutes, and you can keep your result the same day rather than waiting for shipping.
For you, that changes the souvenir payoff:
- You don’t have to store it in a hotel bag for a week.
- You can adjust your travel plan immediately after.
- You’ll remember the whole process while it’s still fresh.
It also means you can plan around the rest of Kyoto with confidence. If you’re doing temples in the morning and walking neighborhoods in the afternoon, this workshop becomes a perfect midday reset. Reviews repeatedly describe it as a welcome break from being on your feet and from listening to tour commentary.
The studio is also described as clean, comfortable, and well equipped. In other words, you’re not doing this in a cramped back room. You’re in a proper workspace built for the technique.
What you can make: shirts, tote bags, and banners
You can choose what to dye. Reviews mention shirts (including T-shirts), tote bags, and decorative banners/hanging pieces. That variety is a practical win, because you can pick something that matches how you actually travel.
If you want something functional, a shirt or tote bag makes sense. If you want something more decorative for your home, a banner or hanging piece gives you a longer-lasting display feel.
Whatever you choose, you should expect a one-of-a-kind result. Wax-resist dyeing changes slightly based on how you apply wax and how the dye reacts. That’s part of the charm, and it’s why your specific design matters so much.
Language and instruction: what to expect when English is limited
Here’s the honest part: English may be limited. Multiple reviews mention little to no English and note that it can be confusing at times. But they also explain that the workshop is hands-on enough that you can figure it out through demonstration and guidance.
So instead of worrying you’ll need to be fluent, plan to be present. Watch the motions. Ask questions when you can. Follow along step-by-step.
The good news is that instructions seem to be delivered patiently. People specifically praise how the instructors take their time and gently show techniques to help you reach a better outcome. Even when language is thin, the teaching style sounds supportive.
Price and value in Kyoto: why $25.77 can be a smart buy
At $25.77 per person, this workshop lands in the “low enough to try, high enough to be meaningful” category. You’re paying for more than a seat. You’re paying for materials, step-by-step instruction, and the finished wearable or hangable souvenir.
In Kyoto terms, it’s also a good swap when you’re tired of museum tickets and guided walking routes. For that money, you get active participation plus a keepsake that looks like it came from a real studio, not a tourist shop.
And because the group size is kept to a maximum of 30, you should generally expect attention to the process. Reviews emphasize how people can take as long as needed and still feel supported, which is part of the value.
If you’re traveling as a family, the workshop is also priced in a way that makes a shared activity realistic. One review calls out a family group including teens enjoying the “disconnect” feeling—phones stayed away during the crafting.
Getting to Roketsu73: not central, but worth the trip
Roketsu73 is located in Ukyo Ward, Nishikyōgoku area, which means it’s not in the thick of Kyoto’s most famous walk-by sights. Reviews describe it as being outside the core tourist areas, which is exactly why it works.
When you leave the main sightseeing grid, you can slow down. You’re not squeezing in another stop between crowds. You’re getting a workshop experience that feels more local and less like a photo-op.
It’s also near public transportation, so you don’t need a car. Just give yourself a little buffer if you’re navigating Kyoto transit for the first time.
Who this workshop is best for (and who may want another option)
This is a great fit if you want:
- A hands-on cultural activity that breaks up walking days
- A souvenir you can actually use, wear, or hang
- A craft with both stencil support and room for freehand creativity
It’s also good if you’re traveling solo and want something peaceful. One review notes doing it alone and feeling comfortable the whole time. The format supports individual creativity even inside a group setting.
It may be less ideal if you need a lot of verbal explanation in fluent English. You’ll get the steps, but the communication style can be visual and tactile more than spoken. If you’re the type who hates following directions without lots of language, consider that upfront.
If you’re short on time, you should still be able to do it, but keep schedule flexibility in mind. Complex designs can extend the session.
FAQ
How long is the Roketsu dyeing experience?
The experience is about 2 hours approximately, and the full journey is typically around 90–120 minutes.
Can I take my dyed item home the same day?
Yes. You can take your item out on the day of the workshop.
Do I need drawing or art skills to do this workshop?
No special skills are required. Guidance is given throughout the process, and even people who feel less artistic have produced good results.
Can I use my own sketch?
Yes. If you have your own sketch, original works can also be produced.
What items can I dye?
You can dye items like T-shirts, tote bags, and decorative banners/hanging pieces, depending on what you choose at the workshop.
Is English widely spoken during the class?
English may be limited. Instruction is hands-on, and you may rely more on demonstration and guidance than detailed verbal explanation.
What if the weather is bad?
The experience requires good weather. If it’s canceled due to poor weather, you’ll be offered a different date or a full refund.
What is the cancellation policy?
You can cancel for free up to 24 hours in advance for a full refund. If you cancel less than 24 hours before the start time, the amount paid is not refunded.
Should you book this Roketsu dyeing workshop?
If you want a Kyoto souvenir that feels made by you, book it. The strongest reasons are simple: 100% bucket dyeing, a full hands-on process, and a same-day item you can wear or display.
I’d especially book this if you’re craving a calmer break from sightseeing, or if you like crafts where mistakes are part of learning. Go with a flexible schedule, since detailed designs can run longer than the basic time estimate.
If you’re only looking for a quick pass-through experience or you need lots of fluent English explanations, you might prefer something else. But for most people who enjoy making something real, this one is a solid, good-value choice in Kyoto.